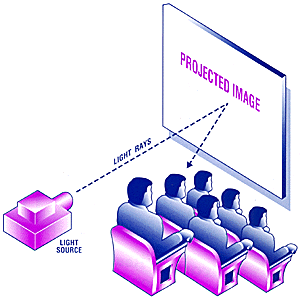
The use of projection equipment for scenery purposes dates back to the 1860's, predating even the incandescent lamp. But the art of projection has come a long way since the 19th century. The wide range of projectors, slide production techniques, and scenic materials make the concept of scenery projection accessible to just about everyone, from the smallest local theatre to the biggest Broadway production.
As long as there have been projections, there have been questions. "Which projector should I use?", "How do I make the slides?", and "What material should I project on?" are among the most frequently asked questions. While projection as a subject is much too broad for a single TechNote, this edition hopes to answer some of the most commonly asked questions about one important part of projection technique—projection surfaces.
Muslin, scrim, painted scenery, fog, and even actor's bodies have been used at one time or another for projection. While somewhat adequate, depending on the needs of the script, none of these can compare in luminescence to a scenic element specifically designed for use as a projection screen. None of the other materials listed above can be used for rear projection, either because they are opaque, or because the color of a slide cannot be transmitted with true optical clarity.
In order to choose a projection surface, we must first talk about two methods of projection: front projection and rear projection.
Source - the lighting instrument (slide projector, video projector, PANI projector) being used to project the picture that the audience will see.
Slide - the picture that will be projected to the surface by the source.
Projected Image - the picture the audience actually sees.
Surface - the material the image is seen against.
Front projection is the use of a source to bounce an image off a surface and back to the viewer. In this case, the surface should be highly reflective, in order for the audience to get the brightest image possible. "On equal-intensity, distance, and size-of-image bases a front projection is brighter than a corresponding rear projection. In short, it takes less wattage to project the same image from the front than from the rear". The source is normally hidden from the audience, but must be placed with a clear throw to the surface. If the throw is very long, a source with the appropriate wattage should be chosen.
This method is best for situations where the source is not very strong, as a highly reflective surface will maximize the amount of light being bounced back at the user. A front projected image maintains its intensity, clarity, and contrast through a wide angle of vision, meaning those sitting house right and left can see the image almost as well as those in the center of the audience.
Using a front projection surface has some disadvantages, however First, having a very light colored surface on the stage can be distracting. Some designers feel their audiences are left "waiting for the movie to start". The bright surface also reflects ambient or "bounce" light back to the viewer, which can cause the image to look washed out if care is not taken in lighting the areas adjacent to the surface. Backlighting and sidelighting actors and scenery becomes very important in this situation in order to keep the actors shadow off of the surface. Hiding the source in an extreme lighting position to avoid casting shadows can cause distortion in the image and requires correction in the slide to compensate.
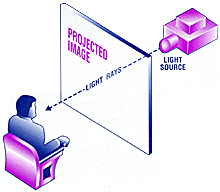
Rear projection is the use of the source to transmit the image through a screen to the viewer. In this case, the surface should transmit an image with true optical clarity and brightness. A higher intensity source is necessary as the light rays are forced through the surface to the viewer By definition the source is masked to the audience, but space must be left backstage between the source and the surface, in order to prevent the actors and crew from casting shadows on the surface. The darker colors included in the rear projection palette allow the surface to blend inconspicuously into the scenery. Actors can stand in front of the screen without blocking the image. Because the image is usually projected on an angle directly perpendicular to the surface, distortion is 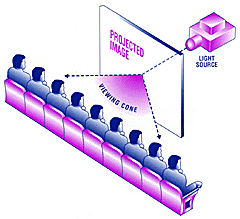 generally not a problem. If the surface is painted, varied and interesting effects can be achieved by projecting them from behind so that they blend with the painted picture. Day to night effects are a perfect example of this.
Rear projection also has its disadvantages. In order to allow the image to pass through it, and because the viewer is usually looking almost directly at the source through the screen, a bright spot ("hot spot") is often visible at the center of rear projected images. Because of the density of the material required to diffuse the image and prevent hot spoiling, the image quality falls off sharply when the viewer is seated outside the 60 to 110 degree viewing cone. The actual size of the viewing cone is dependent on the color of the surface chosen, with darker (and therefore denser) surfaces "falling off" fairly close to the center axis.
Screens For Front Projection Only
Front White projection screen is a highly reflective, opaque material. Front White is best for those situations requiring the brightest images combined with the widest viewing angles. Because the reflectiveness (gain) is so high, this screen will pick up any ambient light. Therefore, care must be exercised in the lighting design to minimize bounce light. (See "Tips on Minimizing Bounce Light").
Screens For Rear Projection Only
Black projection screens are best used in situations with high quantities of ambient light. The dark grey color comes magically to life with fine detail resolution when back lit with a STRONG (bright) image. The color makes the screen inconspicuous within the framework of a set, but its viewing cone is limited to 60 degrees. The direct light transmission is only about 6%, but the excellent contrast between light and dark make for an image which appears substantially brighter Black is particularly suited for ballet and opera where the dark surface absorbs the reflections of follow-spots from the floor.
Grey projection screens have many of the advantages of black screen while opening up the viewing angles to accommodate a wider audience. The medium grey color still helps blend the screen into the scenery, and provides true-to-life image color and clarity. The viewing cone opens up to 120 degrees, and the lighter color means higher light transmission, and therefore, a brighter image.
Light Translucent projection screen is a slightly opaque, very light grey screen with a variety of uses. For projection, it is best used in high ambient light situations, particularly in outdoor installations (see care and maintenance instructions), because the extremely high light transmission of the screen allows the image to compete with the bright ambient light. Care should be exercised in avoiding the line of sight a between the viewer and the projector, however, due to the hot spot that would be seen because the screen is so translucent.
Other uses for the light translucent screen are bounce drops and diffusion materials.
Screen For Front And/Or Rear Projection
Twin White screen is Rosco's most versatile screen. Its milky white color makes for equally bright images whether front or rear projected. This means that a designer can cross fade between front and rear projection unnoticed. The viewing cone on this screen is almost 180 degrees, meaning that nearly everyone in the audience will be able to see an undistorted image. Because the screen is light colored for front projection reflectance, ambient light will affect the image quality, so care should be exercised in lighting around the screen.
Tips On Minimizing Bounce Light
- Rear-screen projection is less affected by ambient light than front-screen projection, so work with rear-screen techniques whenever possible.
- All Rosco screens have a matte front to deflect ambient light.
- Deaden the reflective quality of the floor by using Rosco Tough Prime Black, or Supersaturated Black mixed with Rosco Clear Flat as a sealer.
- Hang a seamless black scrim at least 2" in front of the screen. The scrim will absorb the light without affecting image quality.
- Adjust the image or the screen to two feet or more above the stage floor so that bounce light is reflected below the screen.
- Make sure lighting instruments in the vicinity of the screen are angled to reduce light being thrown directly on the screen.
- Use high-hats and barn doors to focus light off of or around the screen.
- Have the actors maintain a "neutral zone" at four feet from the screen so that lighting them with backlight and sidelight is easier.
- Maximize the brightness of the image by using high contrast imagery when working with projection materials. Keep the image size as small as possible, and use the proper focal length lens. Keep the projector as close to the screen as possible.
Some Tips On The Care And Maintenance Of Projection Screens
- When the screen is received, allow it to stand overnight and come to room temperature (if necessary; i.e. screen was frozen or in a hot vehicle).
- AS SOON AS THE SCREEN IS AT ROOM TEMPERATURE, REMOVE FROM PACKAGING. LONG TERM FOLDED STORAGE CAN CAUSE UNREMOVABLE CREASES.
- Unroll or unfold the screen from the packing container and attach to the supporting structure. If even tension is needed on a screen, use Rosco Stretch-N-Hooks, designed specifically for tensioning Rosco screen with grommets. Ties may also be used.
- Do not fold screen for long periods of time. Overnight is acceptable, but longer than that will cause the vinyl to crease permanently.
- Store the screen on a horizontal roll. Storing the screen on a roll in a vertical position will cause the screen to compress, also causing permanent creasing.
- Maintain constant temperature as much as possible to minimize effects of long term storage.
- If using a pipe pocket, do not use a pipe larger than 1½", as the vinyl will stretch. On wide widths, support the ends of the pipe to keep it horizontal. This will prevent an arc which will cause the screen to stretch on the ends.
- The screen will hang out to a smooth surface in 8-12 hours, depending on conditions. Focusing lights on the screen will help speed up the process.
- If cleaning is necessary, use a damp cloth and a mild detergent. Make sure detergent is completely removed. Do not soak screen.
- Exposure to UV rays will break down any vinyl product over time. Rosco screens can be expected to stand up to UV exposure for about 3 years, depending on conditions.
- Extreme cold will cause the vinyl to freeze. The screen should be allowed to come to room temperature before its is handled, or the screen will crack.
- Provisions must be made for wind speed, such as perforations, scalloping, strong supporting structures, or break away tie downs.
- Water will not affect the screen as long as any residues and/or cleaning chemicals are removed promptly and completely.
Twin White screen is an excellent cyclorama for film, video, and theatre. The milky white color diffuses light exceptionally well, with no scalloping to give away lighting instruments. Beautiful, infinitely varied effects can be achieved by front lighting from the ground row and rear lighting from the top. Instruments can also be hidden from view by a vinyl cyc, eliminating the need for masking, or by breasting the screen forward 5 degrees. Vinyl screens are durable, easy to care for, and can be made up to 200 feet high, with no practical limit on width. Once a mark gets on a muslin cyc, there is little to be done except spot cleaning. Vinyl screens can be wiped clean with mild detergent, and can be rolled on a batten for permanent storage.
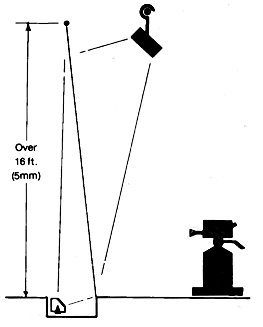 A typical television lighting arrangement Note that the screen is hung tram a rail over the back of the cyc lighting pit. Front lighting positions are conventional Note further that the screen is raked forward (toward the production area) and tied off in the cyc lighting pit. |
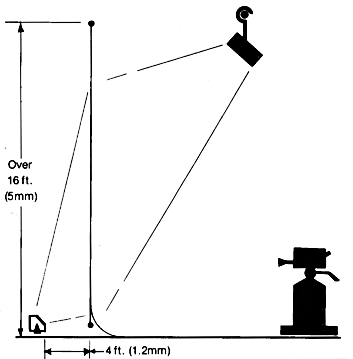 A studio lighting arrangement utilizing vinyl screen. The problems of cyclorama lighting are very much reduced when using screen material because of the special properties of the material as a diffuse reflector Note also that the lighting instruments are masked from the production area by the material itself. |
- Gillette, J. Michael
- "Designing With Light: An Introduction to Stage Lighting" Mountain View, California; Mayfield Publishing company, 1989.
- Parker, w. Owen, and Smith, Harvey K.
- "Scene Design and Stage Lighting" 3rd ed. New York; Holt Rinehart and Winston, 1974.
- Pilbrow, Richard
- "Stage Liqhting" 2nd ed. London; Cassell, 1986.

